大家好!又到 WordPress 主题开发教程的时间了!
开发一个 WordPress 主题,需要掌握的知识点,虽然难度不大,但是多且杂。能坚持到现在的朋友,相信已经对如何开发 WordPress 主题,有了一定的心得。希望我们能一起完成这个 WordPress 主题及教程。
咱们闲言少叙,书归正传。上回我们了解了 WordPress 主题中的小工具。使用系统自带的小工具,相信对于各位已不在话下。这一次要搞定的是如何自定义小工具。
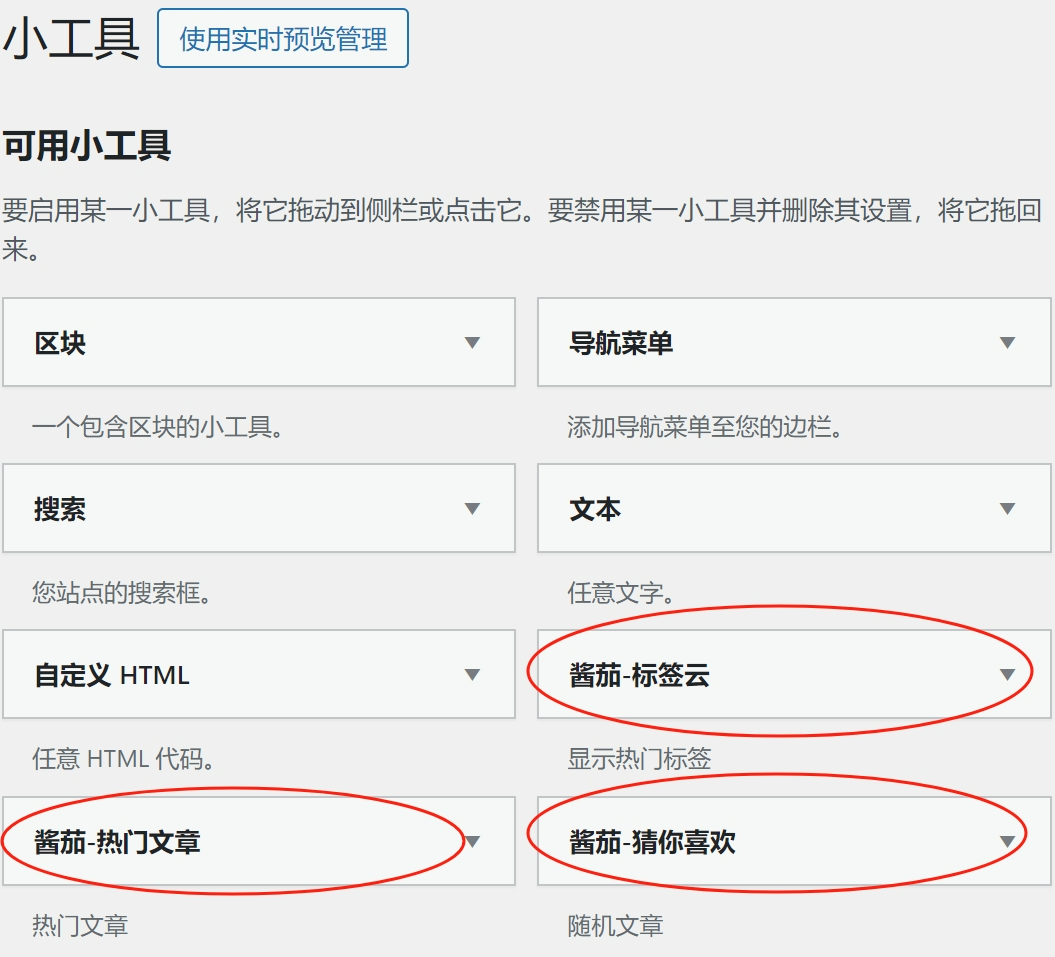
上图中的 【酱茄-标签云】、【酱茄-热门文章】、【酱茄-猜你喜欢】就是自定义小工具。
从何说起呢?咱们先上代码:
add_action('widgets_init', 'the_first_widget_rand_list');
function the_first_widget_rand_list()
{
    register_widget('The_First_Widget_RandList');
}
class The_First_Widget_RandList extends WP_Widget
{
    function __construct()
{
        parent::__construct('the_first-widget-rand-list', 'TheFirst-猜你喜欢', ['description' => '随机文章']);
    }

    function widget($args, $instance)
{
        extract($args, EXTR_SKIP);

        //输出小工具前代码
        echo $before_widget;

        //输出小工具标题
        echo $before_title . '随机文章' . $after_title;

        // 输出随机文章列表
        // TODO:这里是前台显示的小工具的内容

        //输出小工具后代码
        echo $after_widget;
    }

    /**
     * 输出小工具设置表单
     *
     * @param array $instance 现有设置值
     */
    function form($instance)
    {
        // 输出小工具设置表单
        // TODO:这里是小工具的设置表单,可以让用户自定义小工具的显示内容
    }

    /**
     * 保存小工具设置
     *
     * @param array $new_instance 新设置值
     * @param array $old_instance 旧设置值
     * @return array 处理后的新设置值
     */
    function update($new_instance, $old_instance)
    {
        // TODO:处理小工具设置的参数,比如屏蔽某些值
        return $new_instance;
    }
}
上面的代码,可以看作是一个注册 WordPress 自定义小工具的模板。
1. 继承 WP_Widget 类,在类中完成小工具的细节
2. 在 widgets_init 钩子中,使用函数 register_widget 注册刚才的自定义小工具类
我们把上面的代码添加到 functions.php 中,就可以在小工具中看到:
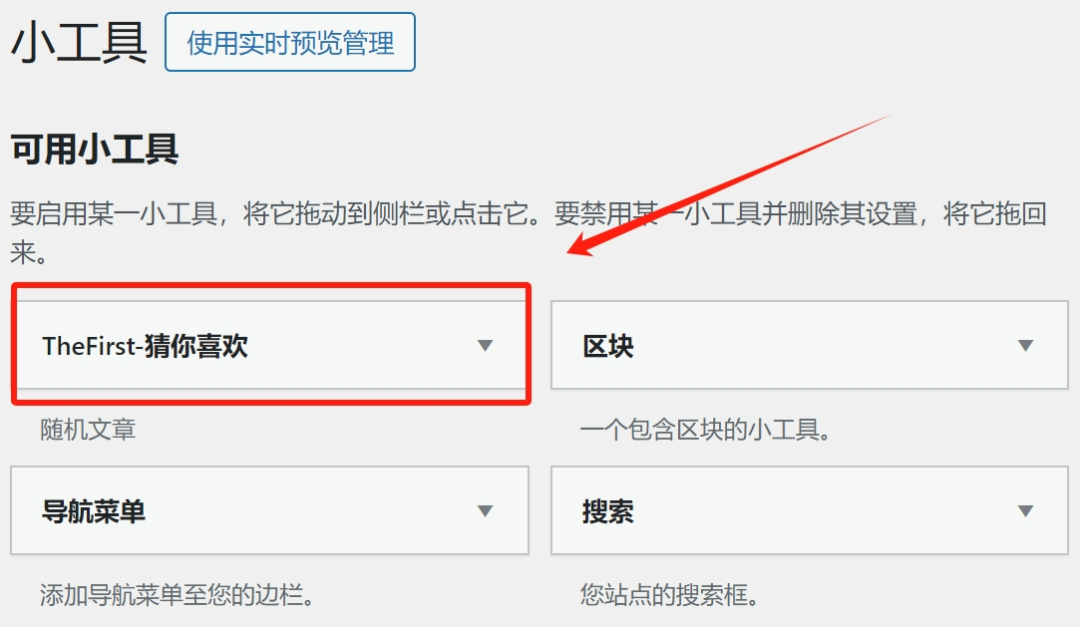
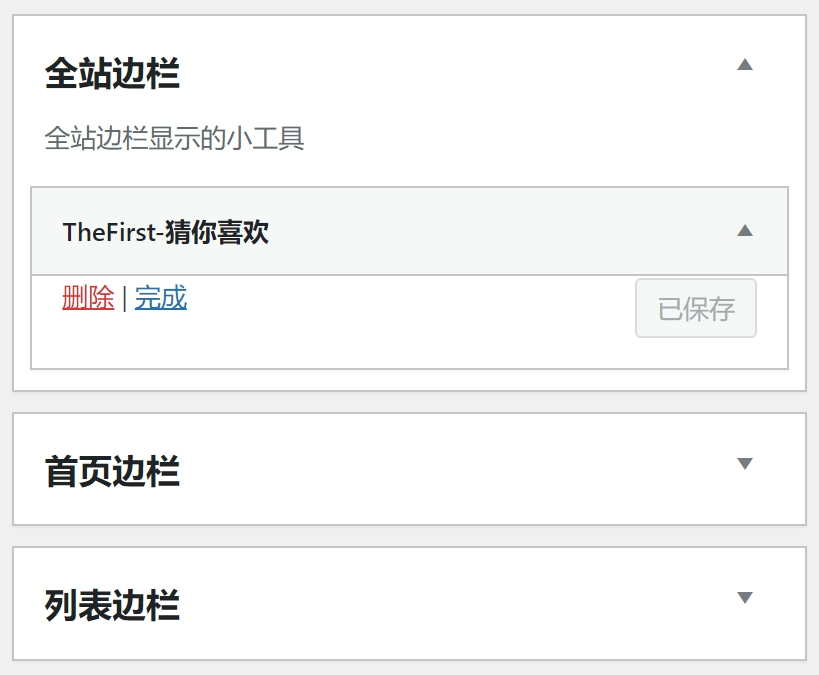
把 【TheFirst-猜你喜欢】拖拽到 全站边栏中:
然后,在网页首页就可以看到:
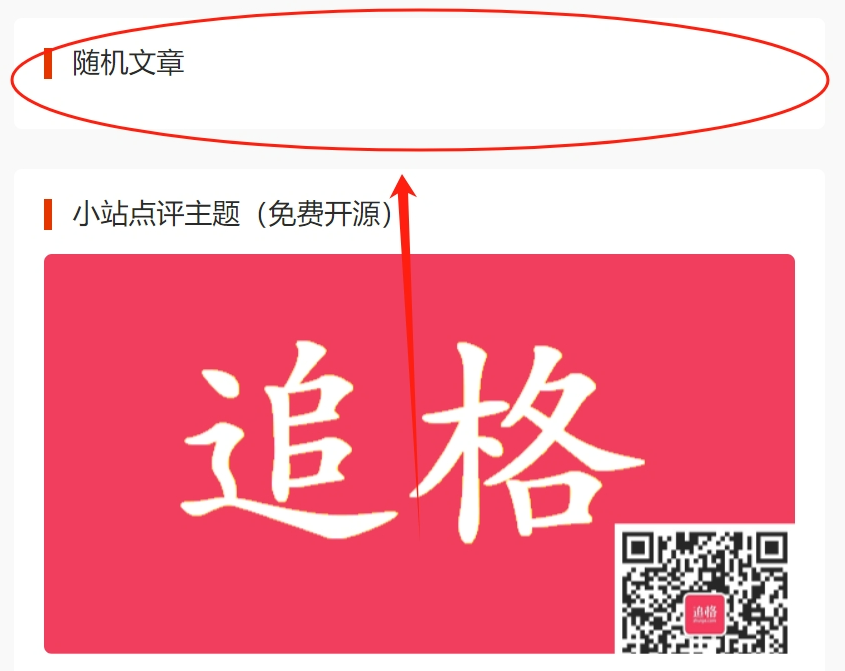
已经可以看到我们的小工具了,只是没有显示出文章。
在之前代码的第32行,也就是“TODO:这里是前台显示的小工具的内容”的后面添加下面的代码:
$args = array(
'order'            => 'DESC',
'showposts'        => 4,
'ignore_sticky_posts' => 1
);
query_posts($args);
while (have_posts()) :
  the_post();
  $thumbnail = the_first_thumbnail_src(get_the_ID(), get_the_content());
  if (!empty($thumbnail)) :
  ?>
    <div class="simple-item simple-left-side">
      <div class="simple-img simple-left-img">
        <a href="<?php the_permalink(); ?>" title="<?php the_title(); ?>">
          <img alt="picture loss" src="<?php echo $thumbnail; ?>" />
        </a>
      </div>
      <div class="simple-content">
        <p>
          <a href="<?php the_permalink(); ?>" title="<?php the_title(); ?>"><?php the_title(); ?></a>
        </p>
        <p class="simple-time"><?php the_time('Y-m-d'); ?></p></div>
      </div>
   <?php else : ?>
      <div class="simple-item">
        <!--无图单文字列表块-->
        <div class="simple-content">
            <p>
              <a href="<?php the_permalink(); ?>" title="<?php the_title(); ?>"><?php the_title(); ?></a>
            </p>
            <p class="simple-time"><?php the_time('Y-m-d'); ?></p>
        </div>
      </div>
    <?php
  endif;
endwhile;
wp_reset_query();
再去首页看一看:
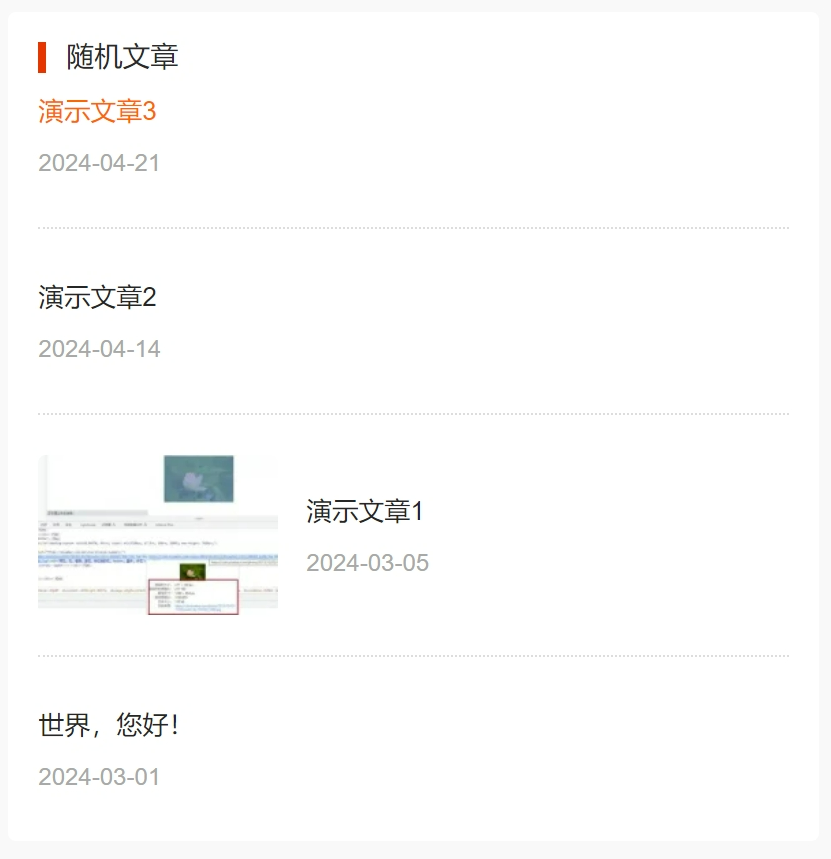
现在显示文章的规则是固定的。如果用户可以配置小工具的标题、显示文章的数量、限制文章分类、指定文章排序方法……,那就更好了。回头看看最开始的小工具代码模板。使用函数 form 就可以了。还是直接上代码吧。
在 form 函数里添加下面的代码:
<p>
<label>
标题:
<input style="width:100%;" id="<?php echo $this->get_field_id('title'); ?>" name="<?php echo $this->get_field_name('title'); ?>" type="text" value="<?php echo (isset($instance['title']) ? $instance['title'] : ''); ?>" />
</label>
</p>
<p>
<label>
排序:
<?php $orderby = isset($instance['orderby']) ? $instance['orderby'] : ''; ?>
<select style="width:100%;" id="<?php echo $this->get_field_id('orderby'); ?>" name="<?php echo $this->get_field_name('orderby'); ?>" style="width:100%;">
<option value="comment_count" <?php selected('comment_count', $orderby); ?>>评论数</option>
<option value="date" <?php selected('date', $orderby); ?>>发布时间</option>
<option value="rand" <?php selected('rand', $orderby); ?>>随机</option>
</select>
</label>
</p>
<p>
<label>
分类限制:
<a style="font-weight:bold;color:#f60;text-decoration:none;" href="javascript:;" title="格式:1,2 表限制ID为1,2分类的文章 格式:-1,-2 表排除分类ID为1,2的文章 也可直接写1或者-1;注意逗号须是英文的">?</a>
<input style="width:100%;" id="<?php echo $this->get_field_id('cat'); ?>" name="<?php echo $this->get_field_name('cat'); ?>" type="text" value="<?php echo isset($instance['cat']) ? $instance['cat'] : ''; ?>" size="24" />
</label>
</p>
<p>
<label>
显示数目:
<input style="width:100%;" id="<?php echo $this->get_field_id('limit'); ?>" name="<?php echo $this->get_field_name('limit'); ?>" type="number" value="<?php echo isset($instance['limit']) ? $instance['limit'] : 0; ?>" size="24" />
</label>
</p>
<p>
<label>
More 显示文字:
<input style="width:100%;" id="<?php echo $this->get_field_id('more'); ?>" name="<?php echo $this->get_field_name('more'); ?>" type="text" value="<?php echo isset($instance['more']) ? $instance['more'] : ''; ?>" size="24" />
</label>
</p>
<p>
<label>
More 链接:
<input style="width:100%;" id="<?php echo $this->get_field_id('link'); ?>" name="<?php echo $this->get_field_name('link'); ?>" type="url" value="<?php echo isset($instance['link']) ? $instance['link'] : ''; ?>" size="24" />
</label>
</p>在函数 form 里,其实就是用代码生成了一个 form 表单。需要注意的是 id、name、value 三个属性的设置方式,分别要用到
$this->get_field_id()
$this->get_field_name()
$instance
这个写法就是个固定的套路,照猫画虎的意思。至于其实现原理什么的,咱先不管了。看看效果:
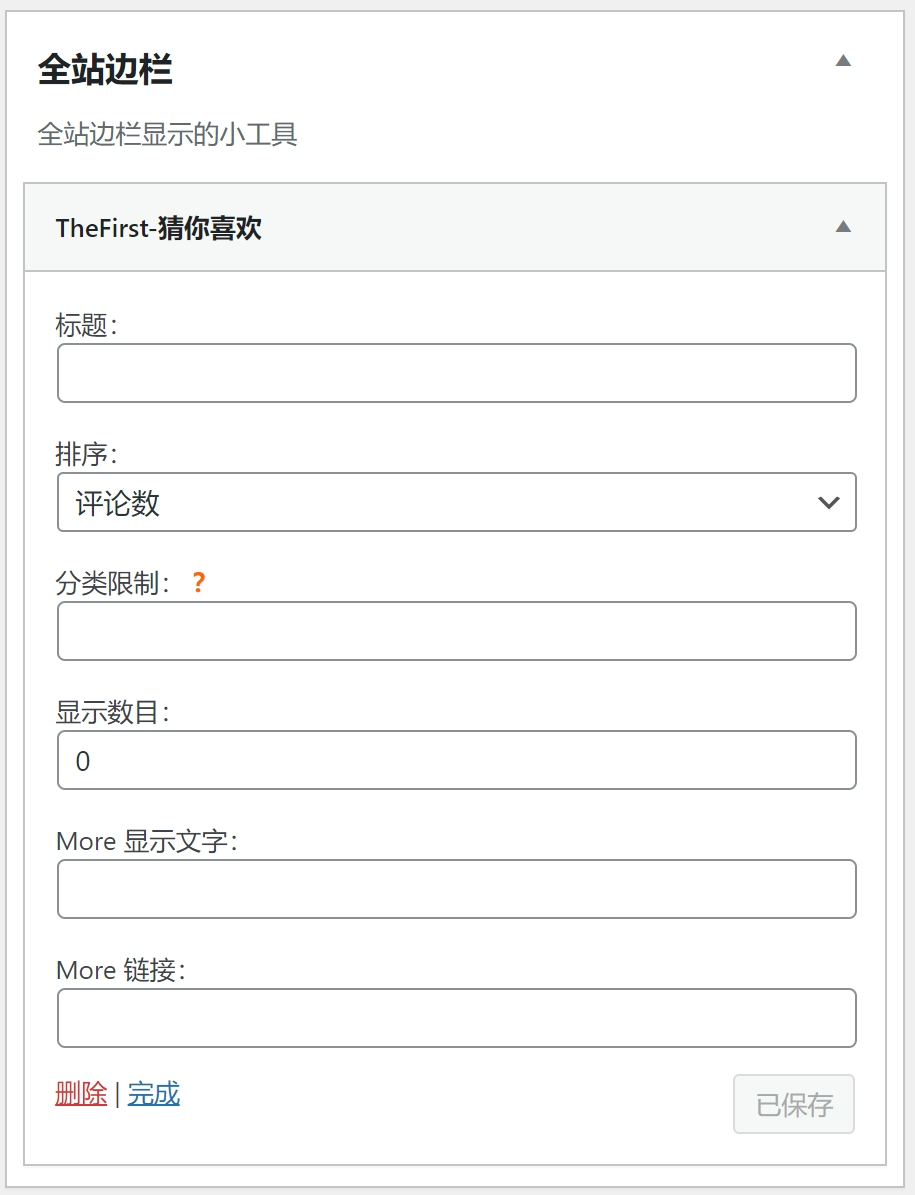
我们先给这里设置好。然后,怎么才能用上这些设置项呢?
在函数 widget 中,使用 $instance 获取这些设置项的值, 就可以使用了。如下:
$title        = apply_filters('widget_name', $instance['title']);
$limit        = isset($instance['limit']) ? $instance['limit'] : 4;
$cat          = isset($instance['cat']) ? $instance['cat'] : '';
$orderby      = isset($instance['orderby']) ? $instance['orderby'] : '';
$more = isset($instance['more']) ? $instance['more'] : '';
$link = isset($instance['link']) ? $instance['link'] : '';

$mo = '';
if ($more != '' && $link != '') {
  $mo = '<a class="btn" href="' . $link . '">' . $more . '</a>';
}
echo $before_widget;
echo $before_title . $title . $mo . $after_title;
echo $this->the_first_rand_posts_list($orderby, $limit, $cat);
echo $after_widget;
the_first_rand_posts_list 是我们把之前查询显示的部分封装成了一个函数。
细心的朋友也许早就发现 form 中构造的表单,不是一个完整的表单。我们是没法按照常规方式对用户输入的值进行检查过滤的。怎么办呢?
回到最开始的代码,还有一个 update 函数。在这里我们可以对用户输入值进行过滤。比如,用户输入的显示数目为负值,或大于99,就强制改为4。代码如下:
function update($new_instance, $old_instance)
{
    // TODO:处理小工具设置的参数,比如屏蔽某些值
    if ($new_instance['limit'] < 0 || $new_instance['limit'] > 99) {
        $new_instance['limit'] = 4;
    }
    return $new_instance;
}
自定义小工具的基础知识点就这些了。只要是动动手,一步步做下来,是不难掌握的。千万别被大段的代码唬住了,那些代码阅读起来比我写的文章更好理解。
最新的代码,依旧上传在
https://gitee.com/zhuige_com/course_jiangqie_theme
https://github.com/zhuige-com/course_jiangqie_theme
下周见!


暂无评论,抢个沙发...